Delete Data
Operasi Delete digunakan untuk menghapus data dari database berdasarkan identitas uniknya (biasanya ID).
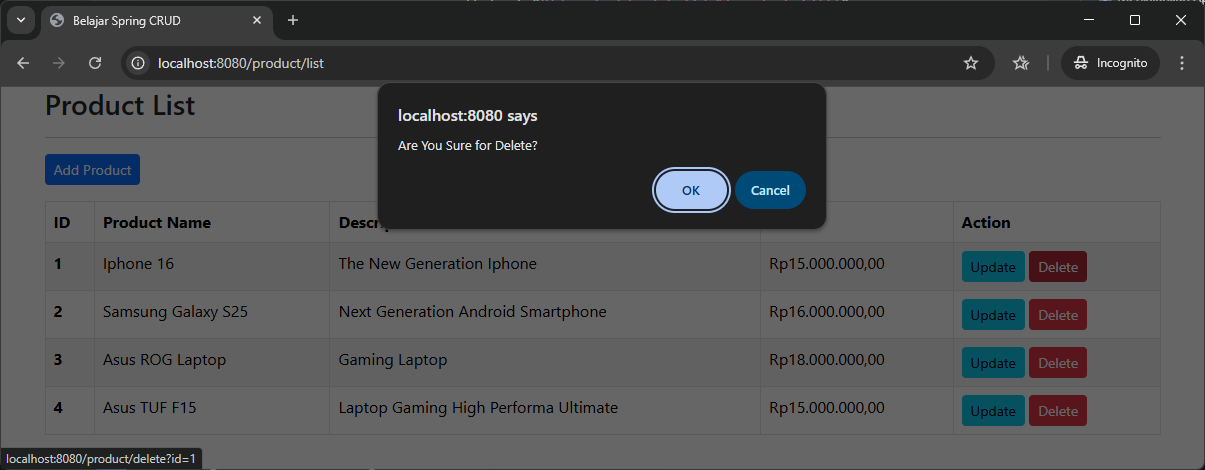
Proses penghapusan biasanya dipicu oleh aksi user pada interface view (seperti mengklik tombol "Hapus" pada tabel).
Alur pada Spring Boot MVC:
- Input: ID unik dari data yang akan dihapus.
- Proses: Mencari data di database dan menghapusnya menggunakan
Repository. - Output: Mengarahkan kembali pengguna ke daftar data (Refresh list).
Untuk contoh kasus pada tutorial ini kita akan menggunakan data Product yang nantinya akan di mapping menjadi table ke database MySQL.

1️⃣ Entity
Entity Product.java:
import java.math.BigDecimal;

import jakarta.persistence.Column;
import jakarta.persistence.Entity;
import jakarta.persistence.GeneratedValue;
import jakarta.persistence.GenerationType;
import jakarta.persistence.Id;
import jakarta.persistence.Table;
import jakarta.validation.constraints.Min;
import jakarta.validation.constraints.NotEmpty;
import jakarta.validation.constraints.NotNull;
import jakarta.validation.constraints.Size;

@Entity
@Table(name = "product")
public class Product {

	@Id
	@GeneratedValue(strategy = GenerationType.IDENTITY)
	@Column(name = "id")
	private Long id;

	@NotEmpty(message = "Cannot be empty")
	@Column(name = "name")
	@Size(min = 1, message = "Min 1 char")
	private String name;

	@NotEmpty(message = "Cannot be empty")
	@Column(name = "description")
	@Size(min = 1, message = "Min 1 char")
	private String description;

	@NotNull(message = "Is Required")
	@Column(name = "price")
	@Min(value = 0)
	private BigDecimal price;

	public Long getId() {
		return id;
	}

	public void setId(Long id) {
		this.id = id;
	}

	public String getName() {
		return name;
	}

	public void setName(String name) {
		this.name = name;
	}

	public String getDescription() {
		return description;
	}

	public void setDescription(String description) {
		this.description = description;
	}

	public BigDecimal getPrice() {
		return price;
	}

	public void setPrice(BigDecimal price) {
		this.price = price;
	}
}
2️⃣ Repository Layer
Layer Repository ProductRepository.
import org.springframework.data.jpa.repository.JpaRepository;

import com.timposulabs.model.Product;

public interface ProductRepository extends JpaRepository<Product, Long> {

}
3️⃣ Service Layer
ProductService.java
import java.util.List;

import com.timposulabs.model.Product;

public interface ProductService {

	List<Product> findAll();

	Product findById(Long id);

	Product save(Product product);

	void delete(Long id);
}
- Implementasi Service
ProductServiceImpl.java
import java.util.List;

import org.springframework.stereotype.Service;

import com.timposulabs.model.Product;
import com.timposulabs.repository.ProductRepository;

@Service
public class ProductServiceImpl implements ProductService {

	private ProductRepository repository;

	public ProductServiceImpl(ProductRepository repository) {
		this.repository = repository;
	}

	@Override
	public List<Product> findAll() {
		return repository.findAll();
	}

	@Override
	public Product findById(Long id) {
		return repository.findById(id)
				.orElseThrow(() -> new RuntimeException("ID Not Found"));
	}

	@Override
	public Product save(Product product) {
		return repository.save(product);
	}

	@Override
	public void delete(Long id) {
		repository.deleteById(id);
	}
}
4️⃣ Controller
ProductController.javakita akan menambahkan halaman form dan method POST untuk menyimpan data.
import java.util.List;
import org.springframework.stereotype.Controller;
import org.springframework.ui.Model;
import org.springframework.validation.BindingResult;
import org.springframework.web.bind.annotation.GetMapping;
import org.springframework.web.bind.annotation.ModelAttribute;
import org.springframework.web.bind.annotation.PostMapping;
import org.springframework.web.bind.annotation.RequestMapping;
import org.springframework.web.bind.annotation.RequestParam;
import com.timposulabs.model.Product;
import com.timposulabs.service.ProductService;
import jakarta.validation.Valid;
@Controller
@RequestMapping("/product")
public class ProductController {
private ProductService productService;
public ProductController(ProductService productService) {
this.productService = productService;
}
@GetMapping("/list")
public String listProduct(Model model) {
List<Product> productList = productService.findAll();
model.addAttribute("products", productList);
return "product/product-list";
}
@GetMapping("/form")
public String showForm(Model model) {
model.addAttribute("product", new Product());
return "product/product-form";
}
@PostMapping("/save")
public String saveProduct(@Valid @ModelAttribute("product") Product product,
BindingResult bindingResult) {
if (bindingResult.hasErrors()) {
return "product/product-form";
}
productService.save(product);
return "redirect:/product/list";
}
@GetMapping("/update")
public String updateProduct(@RequestParam("id") Long id, Model model) {
Product product = productService.findById(id);
model.addAttribute("product", product);
return "product/product-form";
}
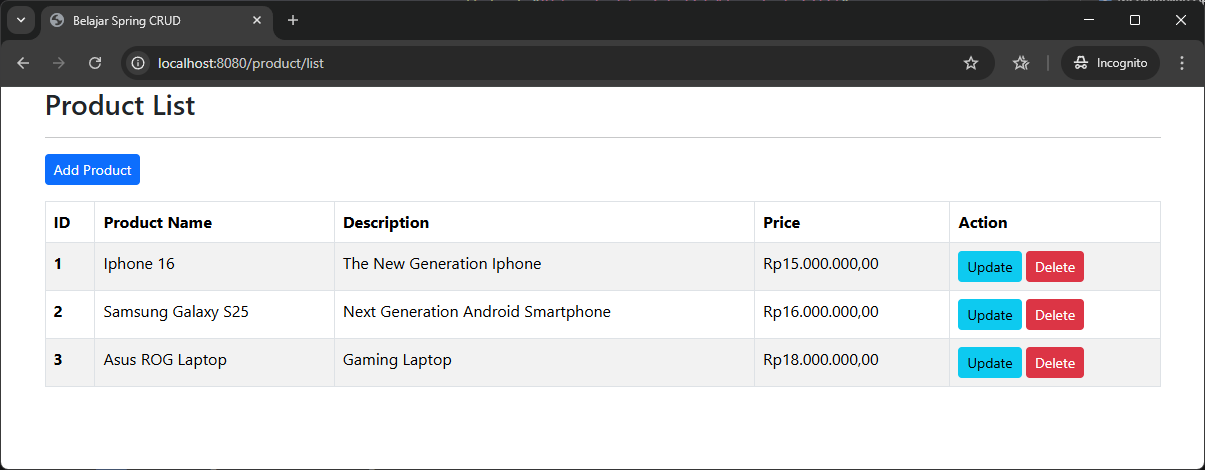
@GetMapping("/delete")
public String deleteProduct(@RequestParam("id") Long id) {
productService.delete(id);
return "redirect:/product/list";
}
}
5️⃣ Membuat View
- Kita akan menambahkan link baru yang akan mengarah ke
/product/delete?id=xxx:
<a th:href="@{/product/delete(id=${product.id})}"
	class="btn btn-danger btn-sm"
	onclick="if (!(confirm('Are You Sure for Delete?'))) return false">
	Delete
</a>
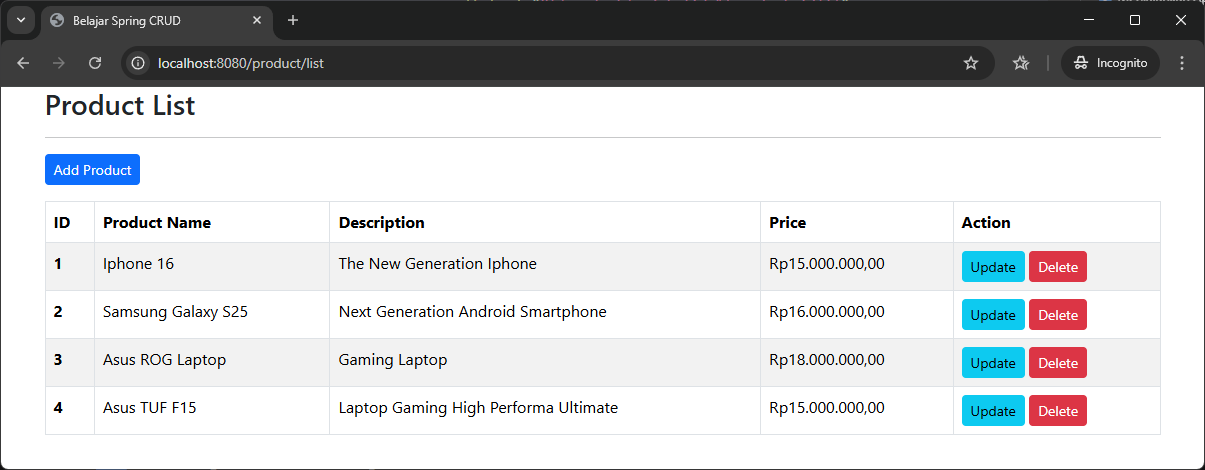
- Membuat view untuk Product List Page
product-list.htmlpada direktorisrc/main/resources/templates/productdimana di sini saya menambahkan Bootstrap untuk css nya.
<!DOCTYPE html>
<html xmlns:th="http://www.thymeleaf.org">
	<head>
		<title>Belajar Spring CRUD</title>
		<meta charset="utf-8">
		<meta name="viewport" content="width=device-width, initial-scale=1">
		<link href="https://cdn.jsdelivr.net/npm/bootstrap@5.3.8/dist/css/bootstrap.min.css" rel="stylesheet" integrity="sha384-sRIl4kxILFvY47J16cr9ZwB07vP4J8+LH7qKQnuqkuIAvNWLzeN8tE5YBujZqJLB" crossorigin="anonymous">
	</head>
	<body>
		<div class="container">
			<h3>Product List</h3>
			<hr />
			<a th:href="@{/product/form}"
				class="btn btn-primary btn-sm mb-3">Add Product</a>
			<table class="table table-bordered table-striped">
			  <thead>
			    <tr>
			      <th scope="col">ID</th>
			      <th scope="col">Product Name</th>
			      <th scope="col">Description</th>
			      <th scope="col">Price</th>
			      <th scope="col">Action</th>
			    </tr>
			  </thead>
			  <tbody>
			    <tr th:each="product : ${products}">
			      <th scope="row" th:text="${product.id}"></th>
			      <td th:text="${product.name}"></td>
			      <td th:text="${product.description}"></td>
			      <td th:text="${#numbers.formatCurrency(product.price)}"></td>
			      <td>
					<a th:href="@{/product/update(id=${product.id})}"
					   class="btn btn-info btn-sm">
						Update
					</a>
					<a th:href="@{/product/delete(id=${product.id})}"
					   class="btn btn-danger btn-sm"
					   onclick="if (!(confirm('Are You Sure for Delete?'))) return false">
						Delete
					</a>
				  </td>
			    </tr>
			  </tbody>
			</table>
		</div>
		<script src="https://cdn.jsdelivr.net/npm/bootstrap@5.3.8/dist/js/bootstrap.bundle.min.js" integrity="sha384-FKyoEForCGlyvwx9Hj09JcYn3nv7wiPVlz7YYwJrWVcXK/BmnVDxM+D2scQbITxI" crossorigin="anonymous"></script>
	</body>
</html>
6️⃣ Menjalankan Aplikasi
Menjalankan aplikasi Spring Boot:
- Buka terminal di root project.
- Jalankan dengan perintah Maven:
mvn spring-boot:run. - Buka browser dan akses http://localhost:8080/product/list.